Download Card Kit Help Guides.
DOWNLOAD - PRINT - BUILD
Bring Your Model Railway to Life with 3DK Kits.
We design and produce building kits in a variety of scales and gauges.
When you purchase a 3DK kit, it’s delivered straight to your inbox, ready to download and print anywhere in the world. Your home computer becomes your workshop, allowing you to create realistic model railway buildings instantly.
Today’s home colour printers can achieve resolutions far beyond most conventional “pre-printed” card kits. Once downloaded, you can print your kit as many times as you like—it really is as simple as 1-2-3.

Describe your image.

Describe your image.

Card Construction Tips


-
Instantly Download and Build Your Own Model Railway Buildings.
-
-
3DK lets you instantly download and print realistic model railway buildings right from your home computer! Modern home colour printers can achieve resolutions far beyond most conventional “pre-printed” card kits, so your models will look incredibly detailed.
-
Once downloaded, you can print your kit as many times as you like—no limits, no waiting.
-
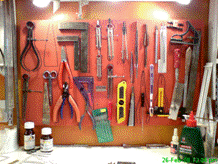
You don’t need an elaborate workshop to assemble our card kits—just a few basic tools to get started, and you’re ready to bring your miniature railway to life.
Tools required
-
Essential Tools for Assembling Your 3DK Kits.
-
A good supply of craft blades is essential—you’ll go through quite a few while cutting out your kit. Card quickly dulls blades, and a blunt blade can tear and damage your carefully printed kit. Don’t worry if this happens: simply reprint the affected part from the original PDF file.
-
I usually keep a few different knives on hand: one larger blade for long, basic cuts, one for smaller, straightforward tasks, and one dedicated to delicate details, like windows. The delicate-blade is the one you’ll replace most often—you can expect to go through two or three just assembling a single building kit.
-
At 3DK, we use a wide range of hand tools, machinery, casting equipment, drawing materials, and computer hardware/software—but you won’t need anywhere near that amount of equipment to enjoy building your kit at home.
-
The basics are simple: a ruler, scissors, glue, and a few other hand tools are all you need to successfully complete a 3DK structure kit.
How to Download
-
Getting Started with Your 3DK Kit
-
To begin, download the PDF file that is emailed to you after purchase. PDF (Portable Document Format) is the standard for transferring files quickly and easily, ensuring your kit prints exactly as intended.
-
3DK kits are supplied as PDF files, which can be opened, viewed, and printed using Adobe Reader—a free program available for any operating system. If you don’t already have it installed, you can download it here: Adobe Reader.
-
Once your PDF is ready, you’re all set to start printing and assembling your model railway building.
Which paper to use when printing
-
Choosing the Right Paper and Card for Your 3DK Kit.
-
The best paper to use for printing your kit is letter-sized self-adhesive address labels, which are available from most stationery suppliers. These are ideal because the prints can be stuck directly onto 1mm or 500-gram card before cutting and assembling.
-
If you prefer to print on regular paper, be sure to use matte-coated paper, as shown in the images on the right, to get the best results.
-
The kit is designed for use with 1mm or 500-gram card—commonly called “shirt card” or “ticket board.” Most art suppliers carry this type of card, which is usually bright white on one side and grey on the other.
-
If you’re not using self-adhesive labels, we recommend a good-quality spray photo mount adhesive. Alternatives like Pritt Stick or white wood glue can work, but they may be messier and harder to handle.
How to cut out delicate items
-
To cut out delicate items from the kit successfully a razor sharp knife blade is essential. Pick a craft knife and use it only for cutting out the delicate items and replace the blade frequently.
-
Cutting out windows is one of the hardest aspects of building card kits but if done right it can be very successful. The process for cutting out windows begins with a new sharp blade. The order of the cuts are shown.
Cutting and Preparing Your 3DK Kit.
-
Proper cutting techniques are essential to achieve clean, professional results when assembling your 3DK model kit. Follow these steps to avoid mistakes and get the best outcome.
1. Start with the First Cut.
-
The first cut runs from the bottom-left corner to the top-left corner. Do not cut all the way into the opposite corner—stop short to avoid damaging the top edge.
2. Sequence Your Cuts
-
Each cut should follow the sequence from the first to the eighth, always cutting away from corners rather than into them. This ensures crisp, clean corners. If a piece doesn’t fall out cleanly, don’t force it. Simply go over the cuts again until it comes free.
-
3. Cutting Curves and Windows.
-
For round window openings: cut the bottom first, then most of the semi-circle. Use a downward sawing motion with a sharp blade to remove the remaining card.
-
Suspend the card over the edge of your workbench when cutting curves or delicate areas—this works best with an extremely sharp blade.
-
Rather than cutting freehand along curves, cut small slices off the curve gradually. Finish the last small sections using the flat edge of a sharp knife.
-
Complete circles can be cut using the same technique: square off the initial cuts, refine the shape with subsequent slices, and finish with the flat blade.
4. Freehand Cutting.
-
Small, fiddly pieces, such as the station valance, are often best cut freehand using a scalpel or Stanley knife.
-
Scalpel blades are firm and precise; they can also be re-sharpened on an oil stone, extending their life.
-
Stanley knives are excellent for applying pressure on small areas and cutting larger sections of the kit.
5. Doors and Windows First.
-
When cutting walls, always cut out door and window openings before the main wall sections. Use several light cuts rather than forcing the knife through heavy card.
6. Plan Your Sequence.
-
Before cutting, plan the order of cuts to prevent parts from moving or coming loose. Keep the card stable by pinching it against the workbench and clamping a steel rule over the workpiece.
7. Scoring and Folding.
-
Score all delicate parts before removing them from the sheet. Use a dull-edged knife for light scoring.
-
Practice scoring on scrap card or paper before attempting the real piece.
-
Bend parts prior to assembly. If folding in the opposite direction of the score line, prick a small pin mark on the reverse to guide your fold.
-
When a score line extends into a cut line, score the full line first, then cut through only where needed. This ensures all edges line up properly.
Weathering Your 3DK Buildings.
Almost any surface on your model can be weathered using a dry brush technique, giving your buildings a realistic, worn appearance.
Preparing the Kit.
Before weathering, it’s recommended to spray your card kit with Testors Dullcote. This protective coating allows you to apply weathering without damaging the card.
Dry Brush Technique.
-
Use an old, flat-faced brush for the best results.
-
Mix a small amount of paint with minimal thinner or water.
-
Rub the brush onto a scrap piece of cardboard to remove most of the paint.
-
Gently apply the almost-dry brush to the model in soft, circular motions.
-
For wood surfaces, follow the grain of the wood to enhance the natural look.
This technique leaves faint traces of color that replicate natural wear and aging.
Using Weathering Chalks.
Weathering chalks designed for model railroading are especially effective because they contain fixatives that adhere to plastics and other shiny surfaces. Recommended brands include Bragdon and Bar Mills, available in primary colors such as black, rust, raw sienna, and burnt sienna.
-
Apply with a soft brush, even a makeup brush works well.
-
If using commercial chalks, you generally do not need to overspray with Dullcote unless the model will be handled roughly.
-
For powdered chalk made from artist’s chalk, a light spray of thinned acrylic matte varnish will seal the powder in place.
Tips for Realism.
-
Highlight areas prone to water exposure, such as leaking drainpipes or rising damp.
-
Use light layers to build up color gradually, creating a subtle, natural effect.
-
Weathering powders can be purchased or made by grinding artists’ chalk over sandpaper.
These techniques can be used anywhere you want to age or distress your models, adding depth and realism to your miniature railway scenes.
-
Contact Us
-
For more information or any questions about our kits, get in touch:
-
Email: tdkcardkits@gmail.com
Website: www.3dk-shop.co.uk